Deploying a Craft CMS Website with Coolify to a 4€ VPS
Learn how to deploy a Craft CMS page to a vps with coolify.
In this tutorial, I'll walk you through how to deploy a Craft CMS website using Coolify, an open-source PaaS, on a Hetzner VPS. We'll go from local development with DDEV all the way to a live production deployment with Docker.
Preparation
Hetzner VPS Setup
First, you'll need a VPS to host your application. Hetzner is pretty solid for this, with decent machines that won't break the bank. Choose a plan, deploy an Ubuntu image (e.g., 22.04), and make sure your SSH keys are added for easy access.
Install Coolify
SSH into your server and install Coolify using the official script:
curl -fsSL https://cdn.coollabs.io/coolify/install.sh | bash
Once installed, Coolify should be accessible at https://your-server-ip:8000, or at a custom domain if you configure one.
Quick Heads-Up: I highly recommend checking out this YouTube video. It'll give you a solid overview of Coolify, and save you a bunch of headaches later. Don't configure Caddy, this does not work as expected.
Set up a Local Test Project
Clone the Repo
For this demo, I made a blank Craft CMS 5 project with Vite 5 installed. You can clone it like this:
git clone git@github.com:samuelreichor/coolify-craft-test.git && cd coolify-craft-test
Start DDEV for Local Development
This will spin up Craft CMS locally.
ddev start
Visit http://coolify-craft-test.ddev.site to verify everything works.
Install Craft
Now you can install Craft by using this command:
ddev craft setup
You can find more information about that command in the Craft CMS first time setup guide.
Dockerizing Craft CMS for Coolify
To get this thing running on Coolify, we've gotta Dockerize the whole project. Now, I know what you're thinking - 'Can't I just use DDEV?' Nope, sorry, doesn't play nice with Coolify. 😭 Which means, we're diving into some Docker Magic. Don't worry, it's not that bad. Mostly.
It all starts with docker-compose.yaml
Create a docker-compose.yml file in the root directory of your project. This file will define the services needed for your Craft CMS application to run: a web server (Nginx with PHP and Node ) and a MySQL database.
services:
  db:
    image: mysql
    environment:
      MYSQL_DATABASE: db # Database name
      MYSQL_USER: db # Database user
      MYSQL_PASSWORD: db # Database password
      MYSQL_ROOT_PASSWORD: root # Root password (credentials only available in the container)
    volumes:
      - db_data:/var/lib/mysql # Maps the 'db_data' named volume to MySQL's data directory
    healthcheck: # Configures a health check for the database
      test: ["CMD", "mysqladmin", "ping", "-h", "localhost"]
      interval: 1s
      timeout: 3s
      retries: 10

  web:
    build: # Specifies how to build the Docker image
      context: .
      dockerfile: ./.coolify/Dockerfile # Specifies the path to the Dockerfile
      args: # Passes build arguments to the Dockerfile
        - php_version=8.2 # Sets the PHP version
        - node_version=22 # Sets the Node.js version
    depends_on:
      db:
        condition: service_healthy # Ensures the 'web' service starts only after the 'db' service is healthy
    volumes:
      - assets_data:/app/web/assets # Maps the 'assets_data' named volume to asset directory

volumes:
  db_data: # Defines the 'db_data' volume for persistent database storage (database is not deleted during deploy)
  assets_data: # Defines the 'assets_data' volume for persistent asset storage (assets get not deleted during deploy)
Note: The deployment waits until MySQL is fully ready (not just running) due to the health check. This is necessary for accurate deployment status and will be important when running
project-config/apply.
Dockerfile
Create a Dockerfile within a .coolify directory, which serves as a dedicated space for deployment configurations. This Dockerfile will define the necessary Nginx, PHP, and Node.js environment for Craft CMS.
ARG php_version=8.3
ARG node_version=22

### Stage 1: Node Build Environment
FROM node:${node_version}-alpine as nodebuilder

WORKDIR /app

COPY package.json package-lock.json ./

# Install Node.js dependencies using npm ci for clean and consistent installs.
RUN npm ci

COPY . .

# Build the frontend assets using the build script defined in package.json.
RUN npm run build

### Stage 2: CraftCMS + PHP
FROM craftcms/nginx:${php_version}

USER root

# Install Composer: Copy the Composer executable from the official Composer image.
COPY --from=composer:latest /usr/bin/composer /usr/bin/composer

# Install system tools like git, unzip, bash, and vim using apk (Alpine Package Keeper).
# --no-cache avoids caching package lists, reducing image size.
# mariadb-connector and mysql-client are needed to use mysqldump in the web container.
RUN apk add --no-cache git unzip bash vim mariadb-connector-c mysql-client

WORKDIR /app

# Copy the composer.json and composer.lock files to the working directory.
COPY composer.json composer.lock ./

# Install PHP dependencies using Composer, with --no-interaction, --no-dev, and --optimize-autoloader flags.
# --no-interaction: Prevents Composer from prompting for user input.
# --no-dev: Skips installing development dependencies.
# --optimize-autoloader: Improves autoloader performance.
RUN composer install --no-interaction --no-dev --optimize-autoloader

# Copy the compiled frontend assets from the nodebuilder stage to the /app/web/dist directory.
COPY --from=nodebuilder /app/web/dist /app/web/dist

# Copy the rest of the project files (backend code) into the container.
COPY . .

# Set permissions for Craft CMS directories and .env file.
# Create the storage, cpresources, and assets directories if they don't exist.
# Change ownership of config, storage, cpresources, assets, and .env to www-data.
# Set file permissions to 775 (read, write, execute for owner and group, read and execute for others).
RUN mkdir -p /app/storage /app/web/cpresources /app/web/assets \
  && chown -R www-data:www-data /app/config /app/storage /app/web/cpresources /app/web/assets /app/.env \
  && chmod -R 775 /app/config /app/storage /app/web/cpresources /app/web/assets /app/.env

# Switch back to the www-data user to run the Nginx web server.
USER www-data
This Dockerfile uses a multi-stage build to efficiently containerize a Craft CMS application. It first uses a Node.js stage to build the frontend, then a Craft CMS/Nginx stage to serve the application, copying only the necessary built assets and backend code to minimize the final image size.
Deploy with Coolify
Alright, let's get your Craft CMS project up and running on Coolify. It's not too bad, but there are a few things to watch out for.
1. Create a Project and Add a Resource
- First things first, log in to your Coolify dashboard.
- Then, create a new project. Pretty straightforward.
- Next, you'll need to add a new resource. When you do that, choose "Public Repository" as your deployment method.
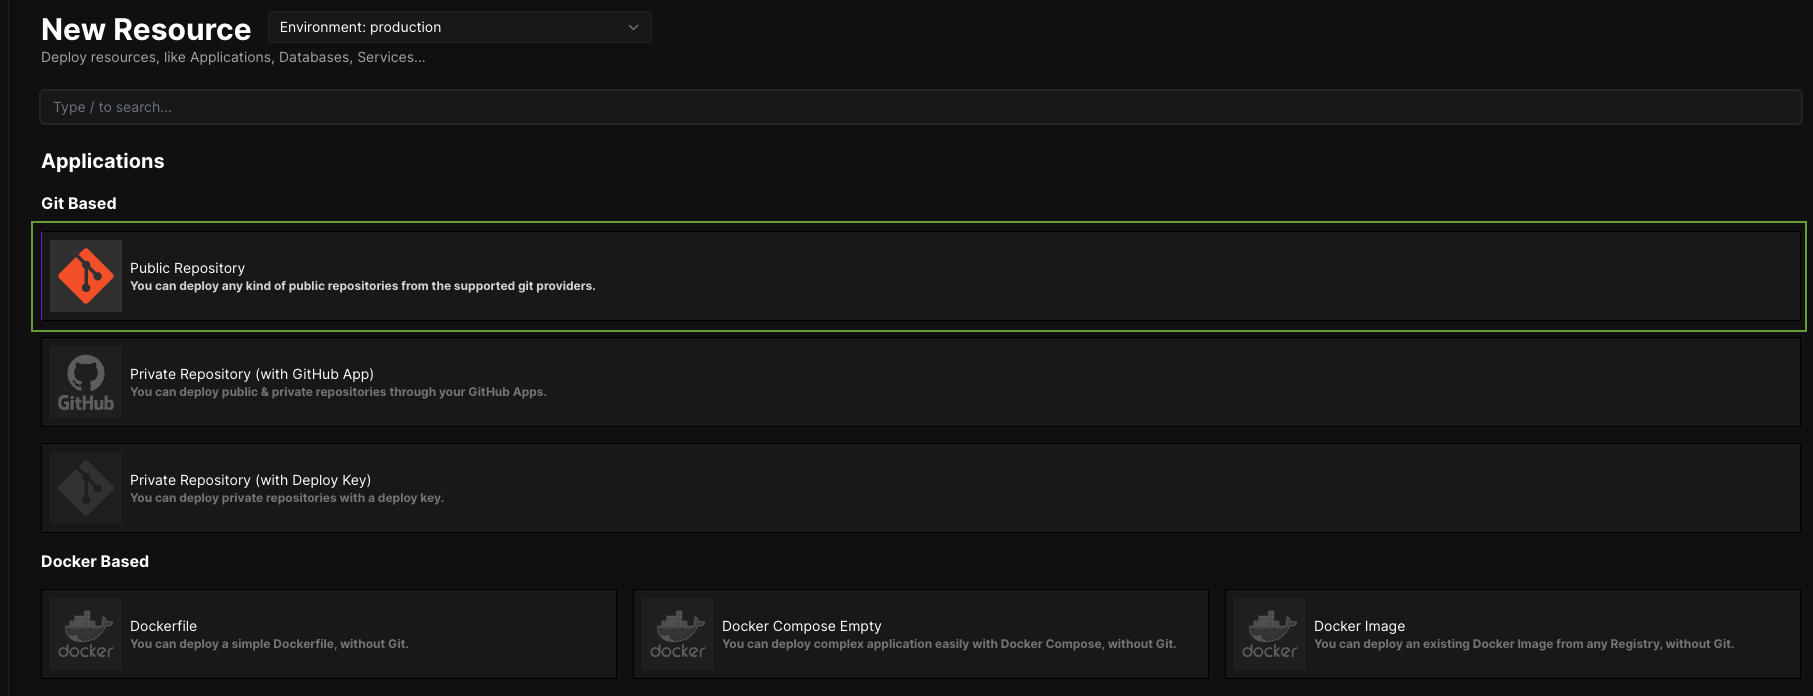
Important Note: You really want to use Git-based resources here, not Docker. I know, it's confusing, and I messed this up the first time too. But trust me, Git-based is what you need for things like auto-deployments when you push to your repo, and those are super handy.
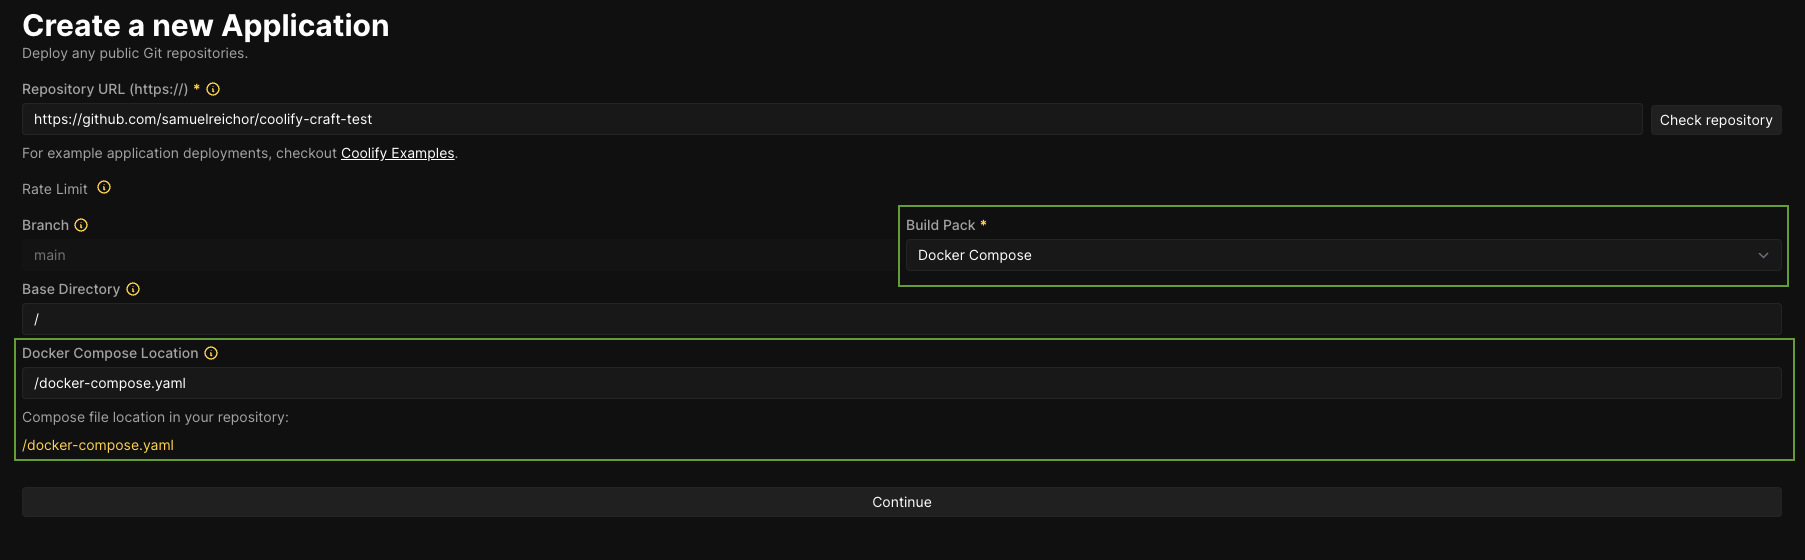
2. Set Up the Repository Details
- Now, you'll have to give Coolify the URL of your repository on GitHub. If you're using my starter repo, it's https://github.com/samuelreichor/coolify-craft-test.
- For the Build Pack, make sure you select "Docker Compose."
- Coolify should then automatically detect the
docker-compose.yamlfile in your repo. Double-check that it does! If it looks good, hit "Continue."
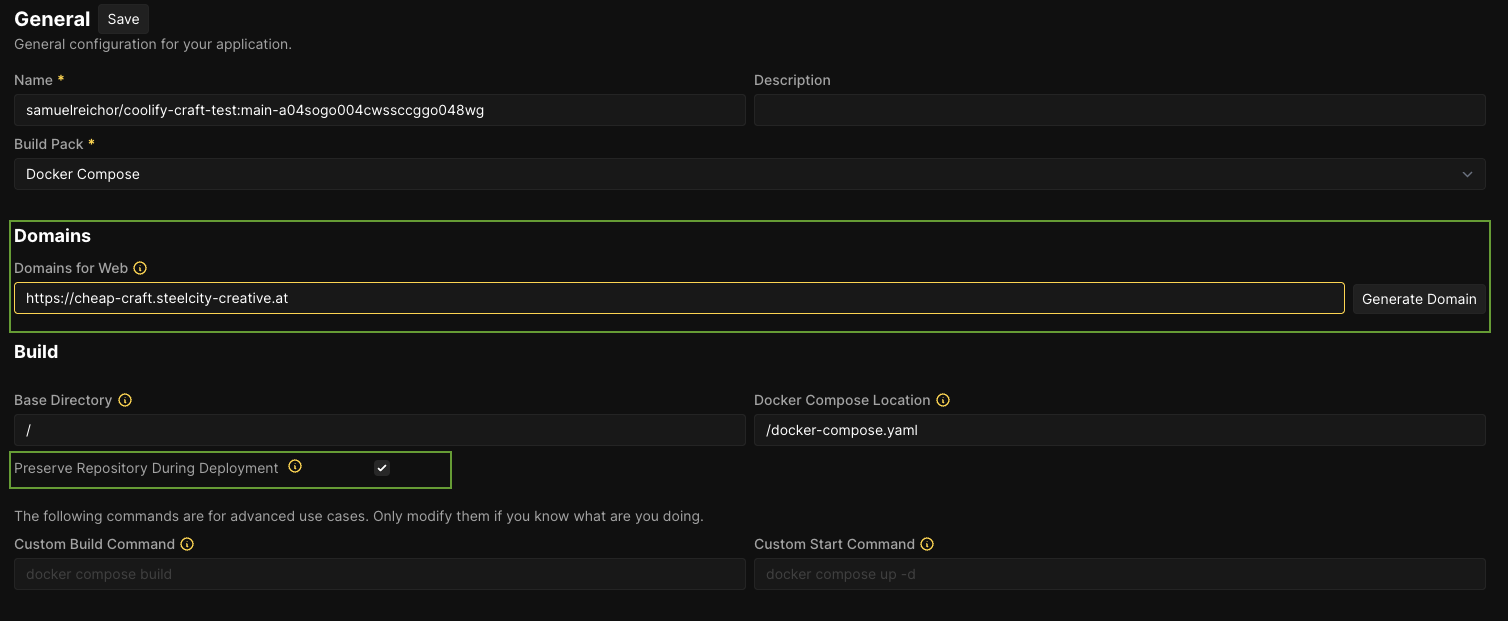
3. Configure the Web Container
- You'll need to assign a domain to your web container.
- And don't forget to tick that little checkbox in the screenshot! It's easy to miss.
4. Add Environment Variables
- In the left sidebar of Coolify, find Environment Variables.
- Add the following variables (Pro tip: If you enable the developer view in Coolify, it'll make adding these a lot faster!):
CRAFT_ENVIRONMENT=production CRAFT_APP_ID= CRAFT_SECURITY_KEY= CRAFT_DB_DRIVER="mysql" CRAFT_DB_SERVER="db" CRAFT_DB_PORT="3306" CRAFT_DB_DATABASE="db" CRAFT_DB_USER="db" CRAFT_DB_PASSWORD="db" CRAFT_DB_SCHEMA= CRAFT_DB_TABLE_PREFIX= PRIMARY_SITE_URL="https://cheap-craft.steelcity-creative.at" - Don't forget to save these! It's easy to forget.
5. Deploy!
You can finally deploy your application! Just click the "Deploy" button in the top right corner.
6. Install Craft
- Unfortunately, we're not quite done yet. You still have to install Craft.
- To do this, select your web container in Coolify and connect to it.
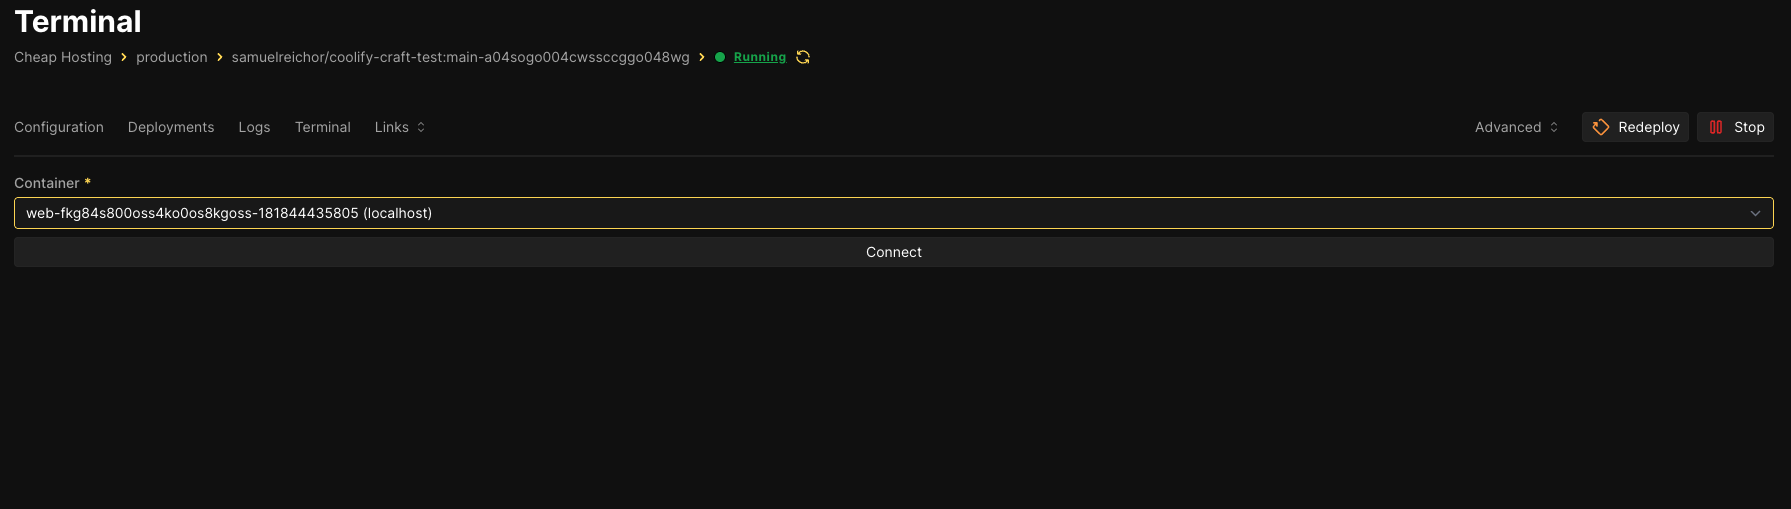
- Then, run the command
php craft setup. After that, your site should be live and kicking! 🚀
7. Apply Migrations and Config Changes (Post-Deployment)
- Go to the "General Configuration" and scroll down to "Pre/Post Deployment Commands."
- You can put commands here that you want to run automatically after a successful deployment. For me, it's usually something like
php craft up && php craft clear-caches/all, but you can also put the path to a script if you need to do something more complicated.

8. Done 🚀
Final Words
Coolify is an amazing open-source tool that enables us developers to share our apps with the world for the price of a beer. 🍻
I'd love to hear your thoughts on this! If you have any questions (or thoughts) email me :)
Thanks!
Huge shoutout to Mathias Andrasch and the awesome people on the Discord channel you helped me a lot! If you're looking for some killer Coolify tutorials (and other cool stuff), definitely check out Mathias' articles!