Nuxt
Learn how to deploy a headless Craft Cms site with a Nuxt frontend.
Here are a few ways to deploy your headless project. These guides are based on the Craft Nuxt Starter example. If you have a different setup then these might not work for you. Feel free to raise a GitHub issue if you feel something is missing here.
Coolify
Coolify is a docker based, open-source Paas. For me it is the go to choice for cheap hosting.
Prepare Project
To get started, you can add these files to your project. docker-compose.yaml should be in the root of your project.
services:
  web:
    build:
      context: .
      dockerfile: ./.coolify/web/Dockerfile
      args:
        - php_version=8.3
    volumes:
      - assets_data:/app/web/assets
    depends_on:
      db:
        condition: service_healthy

  frontend:
    build:
      context: .
      dockerfile: ./.coolify/node/Dockerfile

  db:
    image: mysql:8.4
    environment:
      MYSQL_DATABASE: db
      MYSQL_USER: db
      MYSQL_PASSWORD: db
      MYSQL_ROOT_PASSWORD: db
    volumes:
      - db_data:/var/lib/mysql
    healthcheck:
      test: ["CMD", "mysqladmin", "ping", "-h", "localhost"]
      interval: 1s
      timeout: 3s
      retries: 10

volumes:
  db_data:
  assets_data::
Prepare Coolify
1. Create a Project and Add a Resource
- Log in to your Coolify dashboard.
- Then, create a new project.
- Next, you'll need to add a new resource. When you do that, choose "Public Repository" as your deployment method.
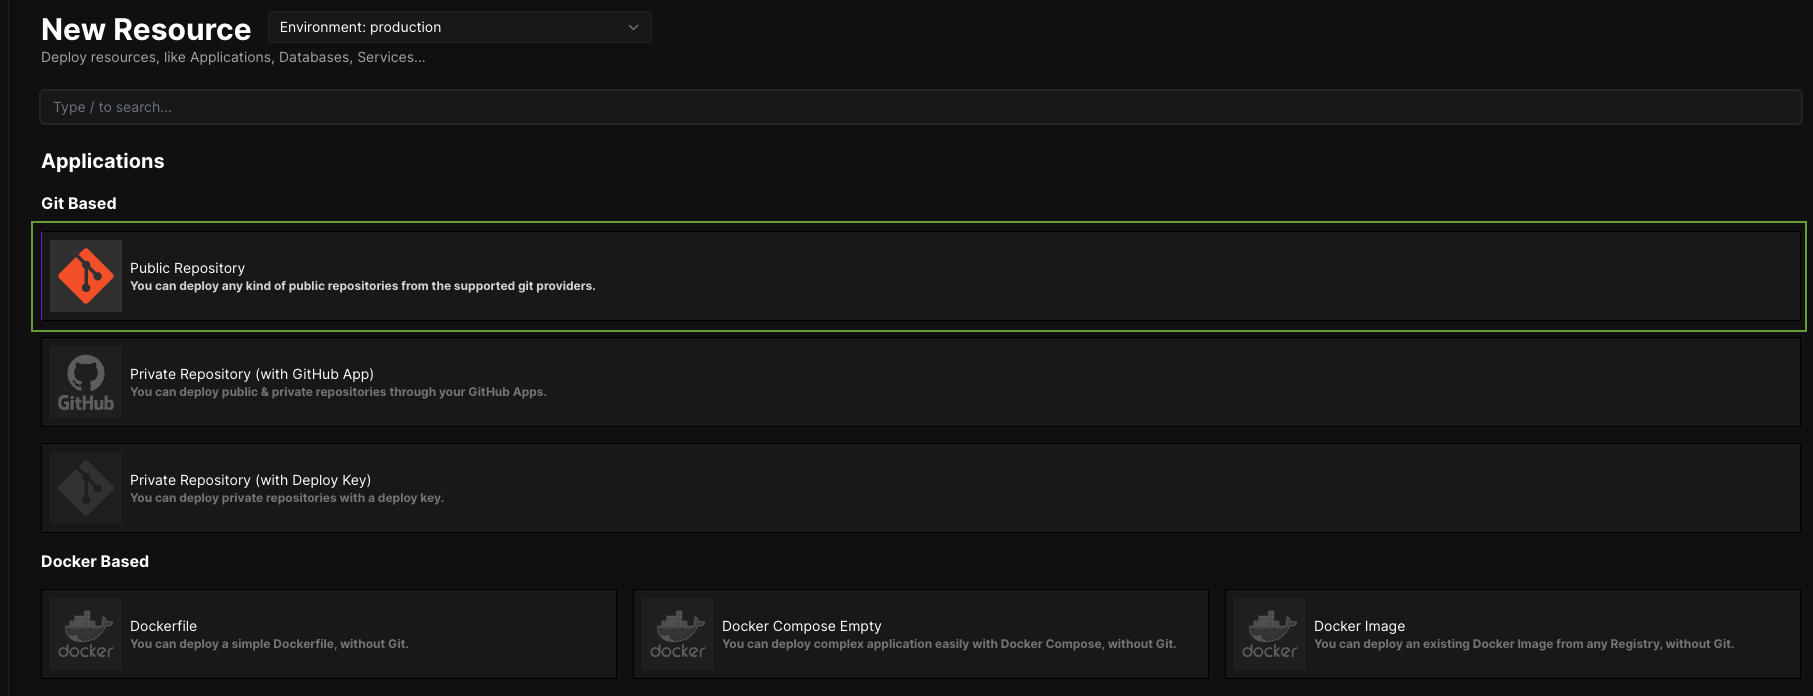
Important Note: You really want to use Git-based resources here, not Docker. I know, it's confusing, and I messed this up the first time too. But trust me, Git-based is what you need for things like auto-deployments when you push to your repo, and those are super handy.
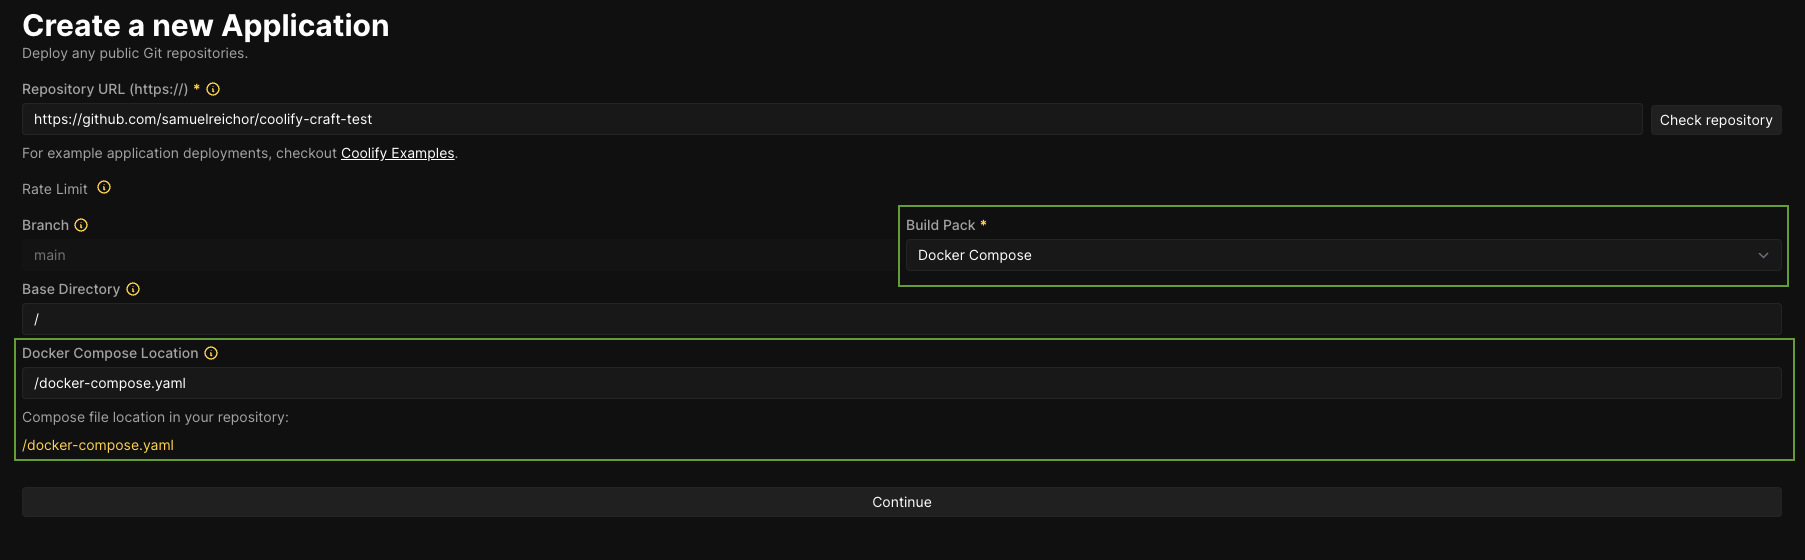
2. Set Up the Repository Details
- Now, you'll have to give Coolify the URL of your repository on GitHub.
- For the Build Pack, make sure you select "Docker Compose."
- Coolify should then automatically detect the
docker-compose.yamlfile in your repo. Double-check that it does! If it looks good, hit "Continue."
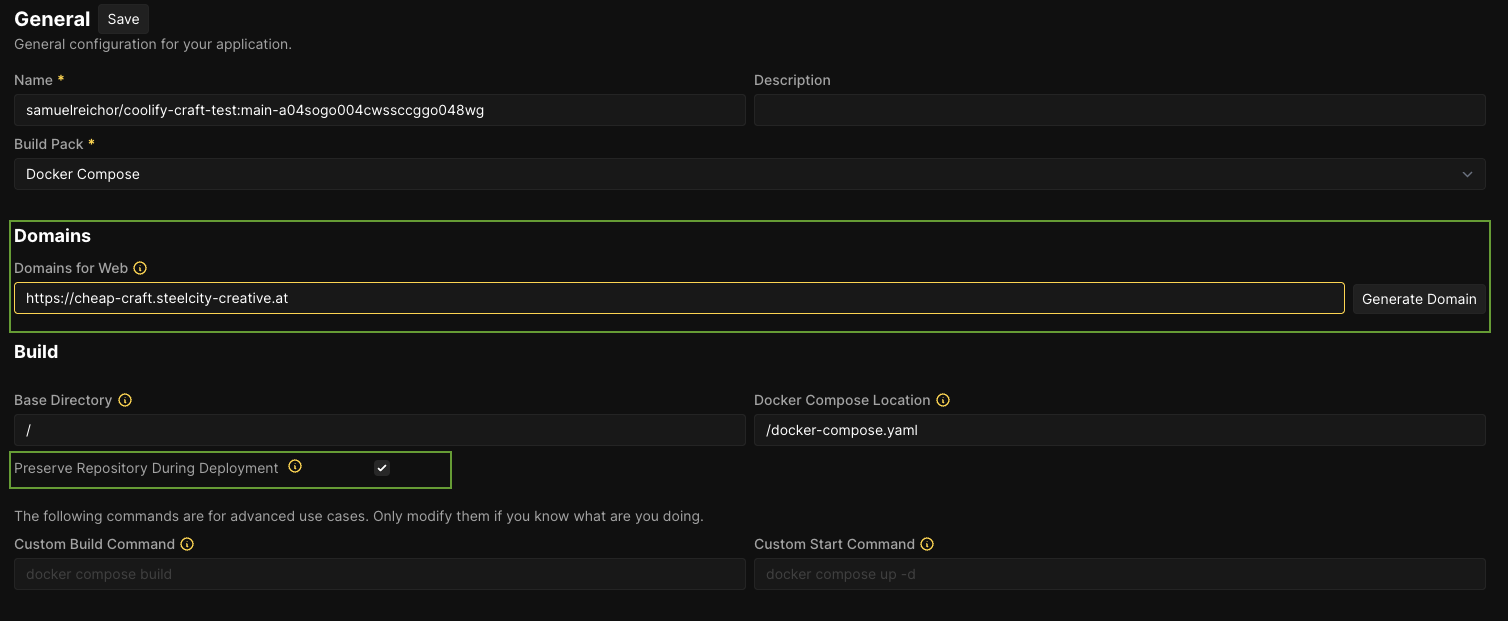
3. Configure the Web Container
- You'll need to assign a domain to your web container.
- And don't forget to tick that little checkbox in the screenshot! It's easy to miss.
4. Add Environment Variables
- In the left sidebar of Coolify, find Environment Variables.
- Add the following variables (Pro tip: If you enable the developer view in Coolify, it'll make adding these a lot faster!):
CRAFT_APP_ID=CraftCMS--bc2c8733-c91a-46fe-87f3-b53b44d38c2e
CRAFT_DB_DATABASE=db
CRAFT_DB_DRIVER=mysql
CRAFT_DB_PASSWORD=db
CRAFT_DB_PORT=3306
CRAFT_DB_SCHEMA=public
CRAFT_DB_SERVER=db
CRAFT_DB_TABLE_PREFIX=
CRAFT_DB_USER=db
CRAFT_ENVIRONMENT=production
CRAFT_SECURITY_KEY=qxyV2FckKZEwr91pVthQNaATzkVE41Zd
FALLBACK_IMAGE=/static/images/placeholder.png
PLUGIN_IMAGERX=XXXXXXXXXXXXXXXXXXXXXXXX
PLUGIN_NAVIGATION=XXXXXXXXXXXXXXXXXXXXXXXX
PLUGIN_QUERY_API=XXXXXXXXXXXXXXXXXXXXXXXX
PLUGIN_SEOMATIC=XXXXXXXXXXXXXXXXXXXXXXXX
PRIMARY_SITE_URL=https://cheap-craft.steelcity-creative.at
PRIMARY_SITE_URL_DE=https://cheap-craft.steelcity-creative.at/de
PRIMARY_SITE_URL_ES=https://cheap-craft.steelcity-creative.at/es
NUXT_CRAFT_TOKEN=iIkWn1cMYA181On591yqdhJluAzI-r1c
NUXT_ENVIRONMENT=production
NUXT_PRIMARY_SITE_URL=https://cheap-craft.steelcity-creative.at
NUXT_PRIMARY_SITE_URL_DE=https://cheap-craft.steelcity-creative.at/de
NUXT_PRIMARY_SITE_URL_ES=https://cheap-craft.steelcity-creative.at/es
5. Deploy!
You can finally deploy your application! Just click the "Deploy" button in the top right corner.
You should now see an error of Nuxt in the frontend (/) and an error of Craft in the backend (/admin).
6. Import Database
Now you can import an existing database into the db container or use the php craft setup command in the web container to start fresh.
7. Apply Changes after Deployment
- Go to the "General Configuration" and scroll down to "Pre/Post Deployment Commands."
- You can put commands here that you want to run automatically after a successful deployment. For me, it's usually something like
php craft up && php craft clear-caches/all, but you can also put the path to a script if you need to do something more complicated.
